Adding an Access Code and Routing Order to a Template
The Advanced tab in the Recipient window allows you add a DocuSign Access Code and configure the routing order for signatures if you need the Recipients to sign the document in a particular order.
For example, you may to add an access code![]() An access code is a password you provide to your recipient. The code can be up to 50 characters long and contain letters, numbers and special characters exlcuding <,>, &, #. You can use upper and lower case letters but the code is not case-sensitive. to ensure only your intended signer can complete the signature procedure. After all of your signatories complete their signature procedure, you may want the last signer to be yourself so you can verify that the document has been completed correctly.
An access code is a password you provide to your recipient. The code can be up to 50 characters long and contain letters, numbers and special characters exlcuding <,>, &, #. You can use upper and lower case letters but the code is not case-sensitive. to ensure only your intended signer can complete the signature procedure. After all of your signatories complete their signature procedure, you may want the last signer to be yourself so you can verify that the document has been completed correctly.
| 1. | In your template, place your cursor where you wish to add the signature block. |
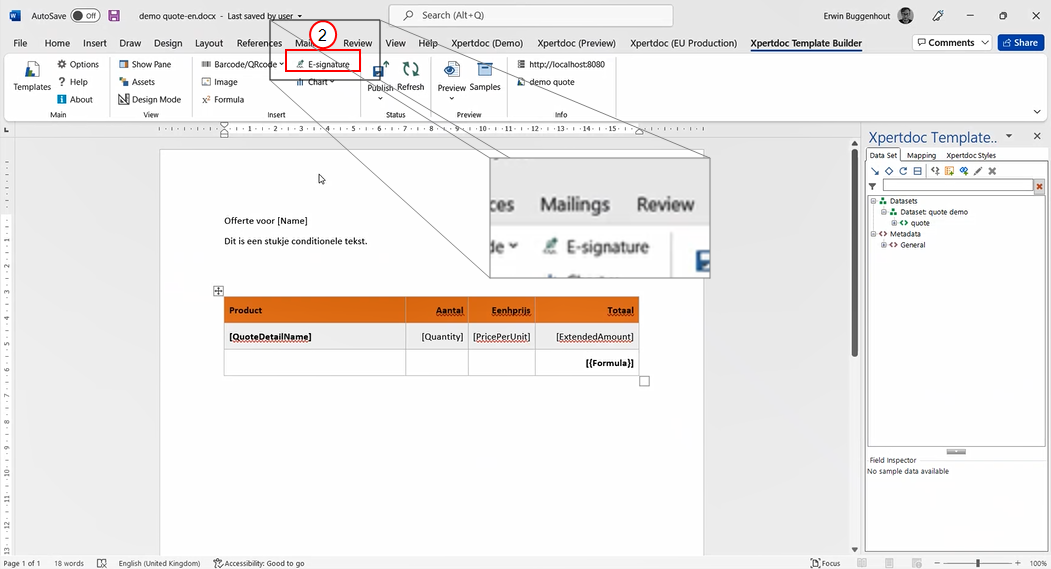
| 2. | In the Template Builder tab, select the E-signature button. |
The blank E-signature field displays with the message " Select or tap here to configure."
The Mapping window displays.
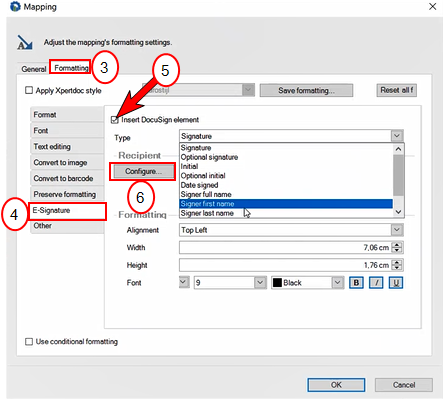
| 3. | In the Mapping window, select the Formatting tab. |
The Formatting window displays.
| 4. | In the list view, select the E-signature option. |
The Mapping window refreshes with the E-signature options in grayscale.
| 5. | Select the checkbox next to the Insert DocuSign element. |
The E-signature settings display in color and can be edited.
| 6. | Select the Configure button. |
The Recipient window displays.
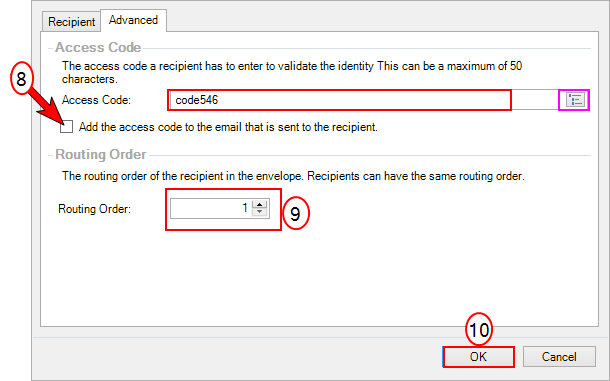
NOTE The person with the lowest routing number receives the document first, and the order proceeds up (1,2,3). Recipients with the same routing order receive the document at the same time. The document won't move to the next signer until all signers of the same routing number have completed the signing procedure.The Recipient window opens on the Recipient tab by default, you can find the access code settings on the Advanced tab.
| 7. | Assign your access code |
| 7.1. | You can type in your access code |
| 7.2. | You can select the icon on the right side of the access code field to assign a field from your data set. |
| 8. | (Optional) Add the access code to the e-mail sent to the recipient. |
| 9. | Assign the routing order |
| 10. | Select the OK button. |
The system saves the changes for the Recipient .
The Recipient window no longer displays.